Mounting an NFS Server

Note: Anything in this
fonts
or
fonts
means that you’ll be typing in the terminal or what you’ll be seeing in the terminal.
NFS (Network File System) is a protocol that allows users to access different files and directories in a network. Typically, the directory shared with the users is created on the NFS server itself, and files can later be added to that directory. In order for users to have access to the files in the directory on the NFS server, the users need to mount the directory on their system.
In this lab, you’ll learn how to mount a NFS share on your laptop.
First, create a new VM for this lab (ex. “san-lab”). Next, we need to make sure we have enough disk space to set up our NFS server. You can run “df -h” to see your current disk usage and “lsblk” to see the partitions of the disk space.
Now, we need to create a new img file. To do so, we run the following:
fallocate -l 20G san.img
where “20G” is the size of our image and “san” is the name of our image. If there’s not enough space, then you can delete any unnecessary files or images on your KVM host and try to run this command again.
Now, in you san-lab.xml file, create a new disk. Change “hda” to “hdb” to create a different disk and change the bus value from “0” to “1.”
<disk type='file' device='disk'>
      <driver name='qemu' type='raw'/>
      <source file='/data/san-lab/san.img'/>
      <target dev='hdb' bus='ide'/>
      <address type='drive' controller='0' bus='1' target='0' unit='0'/>
    </disk>
Now, run “fdisk /dev/sdb” and use some of the commands in this partition guide to create a new primary partition: After partitioning the disk, we actually need to create the file system. To do so, we run: 
mkfs.ext4 /dev/sdb1
where “ext4” is the file system and “sdb1” is the first partition of our disk.
Now, edit “/etc/fstab” and add the following line: https://neatrack.richweb.com/extending-disk-space-of-a-kvm-file-backed-storage-vm-disk-image/
/dev/sdb1 /data ext4
To save your changes, restart the device. Now if you run “lsblk” you should be able to see your dedicated drive. However, we still need to export it over the network. To do so, we can use NFS, which will allow remote systems to be able to access the file share.


Exporting the Drive Over Your Network

Install nfs-server, nfs-common, and nfs-client. If the installation fails, then try running apt update and then install those two packages again.
apt install nfs-server

apt install nfs-commonapt

install nfs-client
To see the file status of nfs-kernel-server, run “/etc/init.d/nfs-kernel-server status”.
Next, edit “/etc/exports” at add the following line:
/data 172.30.106.0 (rw,sync)
Now, restart the nfs-kernel-server by running “service nfs-kernel-server restart”.
In order to let other users edit the NFS server, you have to run “chmod 777 /data”. This allows anyone to read, write, and execute /data, which is being shared over the network.


Setting up NFS Client and Mounting MFS Server in Linux

On your own laptop, go into “Files” and create a new folder in “Home” called “nfs”. Add some files into your nfs folder (ex. pictures).
Now, go back into your terminal and “sudo apt install nfs-common“.
After installing the package, you can edit “/etc/fstab” and add the following line to create a persistent mount:


10.10.10.60:/data /home/user/nfs nfs rw 0 0

Note: if you wanted to create a temporary mount, then you could’ve run “mount -t nfs 10.10.10.60/data nfs”. However, if you restart you computer after running that command, then all the files in your nfs folder will not show up.
Afterwards, run “mount -a” to save your changes. Now, go into the nfs folder and run “ls -alt” to check the file permissions. Run “chmod 777” to change the file permissions and therefore allow everyone to be able to read, write, and execute the files.
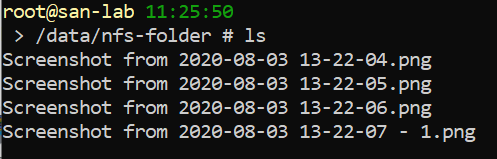
Now, back in your actual NFS server (in “san-lab”), go into /data and run “ls”. Now, you should be able to see the files that you added from your computer.

Setting Up NFS Client and Mounting NFS Server on Windows 10

Follow steps one and two in the following link: https://windowsreport.com/windows-10-free-nfs-server/
However, once you get to step three, you must open file explorer and go into “This PC.” Then, open the “Computer” tab in the upper left corner of your screen.
Once inside the computer tab, select the “Map Network Drive” button.
Now, make sure you have selected an unused drive letter, and follow the example format given for adding the NFS folder you would like to connect to. The server’s IP address will go into the server spot, and the server’s folder that NFS is set up on goes into the share spot.
Note: If you check the “Reconnect at sign-in” box, then your NFS mount will be persistent. A persistent mount means that your computer will mount this NFS server each time your computer is turned on. If the box is left unchecked, then your NFS mount will not be persistent and will disappear when your computer is turned off.