KVM Introduction and Lab
Background Information
Key Benefits of Virtualization
Virtualization is used for a variety of reasons.
1. Most physical servers are underutilized; virtualization allows physical servers to be stacked full of applications to make better use of available RAM and CPU. A single 24 core server can run 30 or more VMs (virtual machines) for example.
2. Virtualizing servers allows for easier snapshots (for backup and recovery) and restoration of crashed servers. A generic server configuration is loaded onto the bare metal as the base OS. All of the application specific configuration is done inside the virtual filesystem of the VM. The VMs get backed up individually like Lego bricks and can be moved or restored to any physical server as needed.
For this lab, we will use KVM or Kernel-based Virtual Machine for our virtualization. KVM is efficient, has native support for almost any guest OS, and is open source. It also gives us the utmost control over every aspect of the virtual machine.
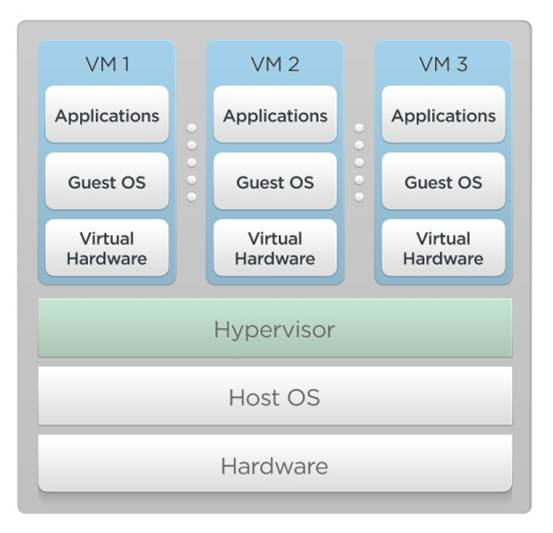
What Virtualization “Looks Like”
When a VM is created, there needs to be a way to interface it, but you do not want to give the VM direct access to the hard drive of the host server. The virtual disk of the guest VM is a file on the host. Inside this file is the entire hard drive of the guest.
KVM uses the qemu hypervisor. The hypervisors job is to provide virtual disk, network, and CPUs to the guest along with other virtual devices like a serial port for console access, or an RDP/VNC port for graphical console access.
A host that has 8 CPU cores and 32 GB of RAM can run 4 guests with 7.5 G of ram each, and 4 separate disk files for guest filesystems. Each guest can have different networks. For example, one guest could be a virtual router, a firewall, a load balancer, or a web server.
The hypervisor schedules each guest as a process on the main host server and provides access to the number of virtual CPUs the guest has been allocated.
Remember the VM sees that file as its hard drive just as a physical server would if you connected a physical drive.
Using a loop device, the host can mount the filesystem of the guest (DONT DO THIS WHILE THE GUEST IS RUNNING) and examine its contents. This is useful for staging a guest VM while it’s not powered up (like prepping a replacement load balancer or firewall for example).
Virtualization:
Creating Your First Guest
Normally, we would create a new KVM guest by cloning another pre-existing VM. If we do not already have a VM, however, this is not an option.
1.) Edit /etc/network/interfaces
root@neatrack1 16:20:46
 > ~ # nano /etc/network/interfaces
It’s important to note that interfaces is a file in /etc/network despite not having an extension such as .txt or .conf.
Keep in mind that this example is for when you are not using any sort of tagged VLAN. If you are using a tagged VLAN, you have to specify the VLAN that the bridge is on. Use the following on the server’s /etc/network/interfaces (you can use vim or nano to enter that file). This should have already been set up in the student setup lab but check it just to make sure (Note: “##” signifies a comment. This is code that isn’t executed but helps describe what is happening):
Port Configuration
Currently you have a default configuration that will look similar to the following:
# The loopback network interface
auto lo
iface lo inet loopback
auto eth0
iface eth0 inet dhcp
up /sbin/ifconfig $IFACE up
We want to change this so that we can trunk multiple vlans (networks) on a single port. There are a couple of different ways we can accomplish this. The first would be by passing individual vlans and vmbrs (which is how a vlan is bridged to a VM for use). It looks similar to the configuration below; now when you’re configuring your interfaces, keep in mind the names that your KVM host is using, as they can be different depending on vendor, model, and even OS. We can even add an IP address to a vmbr.
# The loopback network interface
auto lo
iface lo inet loopback
# The physical interface
auto eth0
iface eth0 inet manual
up /sbin/ifconfig $IFACE up
## define a tagged vlan 60. The switch will send tagged frames
## to the host; the host will send the traffic for vlan60 to
## this logical interface.
auto vlan60
iface vlan60 inet manual
vlan-raw-device eth0
## Build a vm bridge group (bridge interface) that is bound to vlan60
## This will allow kvm guests to have an interface on vmbr60 and talk
## on vlan 60:
auto vmbr60
iface vmbr60 inet static
address 172.30.60.2/24
gateway 172.30.60.1
bridge_ports vlan60
bridge_hello 2
bridge_maxage 12
bridge_stp off
bridge_fd 9
up /sbin/ifconfig $IFACE up || /bin/true
The second way is by creating one “master” vmbr that can be passed to any VM. This allows us to have a shorter interfaces file, while giving us the ability to only have to pass a single vmbr through multiple VMs without having to worry about passing the correct vmbr. However, if you use this method, you must be sure that the VM supports vlan configuration on it’s physical interface. We will get more into that in later. You can also have an IP address, but it will be formatted a little differently from the previous example. You’re interfaces file should look something like this:
# The loopback network interface
auto lo
iface lo inet loopback
# The physical interface
auto eth0
iface eth0 inet manual
up /sbin/ifconfig $IFACE up
## vmbr0 maps to eth0:
iface vmbr0 inet manual
address 0.0.0.0
bridge_ports eth0
bridge_hello 2
bridge_maxage 12
bridge_stp off
bridge_fd 9
up /sbin/ifconfig $IFACE up || /bin/true
## we set an IP address on vmbr0.60:
auto vmbr0.60
iface vmbr0.60 inet static
address 172.30.60.2/24
gateway 172.30.60.1
If you are getting an error, make sure that you changed which physical network adapter you are using. In the above example, the physical network adapter is “eth0”, but that changes from server to server. You run the “ip a” command to see your interfaces and replace “eth0” with whatever interface you are using. It should look something like “ethX”, “enoX”, or “enpXs0” where X is some other number.
In practice restarting the whole networking service is a BAD idea. Reloading the whole configuration after changing only one interface not only resets that interface but yet it disrupts flow on every other one. Because of this we use the command ifup and ifdown to individually reload a single interface.
In the future rather than restarting the entire service run these commands on whatever interface for example if you are restarting vmbr60 use the commands.
ifdown vmbr60
ifup vmbr60
OR
ifup vmbr0.60
Creating a Server from a .xml File
We use a program called virsh that allows us to easily run and manage these machines. Run the command below to change your directory:
root@neatrack1 11:52:21
 > ~ # cd /data/

root@neatrack1 11:52:25
 > /data #
You are now located in the directory that you will be getting your VM files and defining your VMs. Before you start up the machines, you need to get the files guest.xml and guest.img. Here is the link to how you get labs files, you might need this again for labs in the future:
The two files we will use are .img and .xml files. A .img file acts as a virtual hard drive and allows the machine to view that file as its own disk. The .xml file holds the configuration for the virtual machine. It allows you to change core settings about resource allocation, system resources, etc. We will make copies of these two files and edit the .xml file’s new version to create a virtual machine with different resources but with a copy of guest’s hard drive. After we make the copy, when we change the new version, changes WILL NOT be transferred to the old guest machine.
Run the following two commands to create copies of guest under a new name:
NOTE: This will take some time. Wait for the command to finish.
root@neatrack1 11:52:25
 > /data # cp guest.xml dhcp.xml

root@neatrack1 11:56:55
 > /data # cp guest.img dhcp.img
You now have an identical copy of the guest VM. Before we continue, run the command to enter the editor for the VM. Change the following settings to what you see below. They WILL NOT all be next to each other! The first is the VM name:
<name>vm-neatrack-dhcp</name>
Next is the UUID, which is the unique identifier for the VM itself, you’ll typically change that last few character. But, if you are an intern at Richweb and have access the EMS, you may utilize the KVM UUID builder (your instructor can show you where this is located):
<uuid>0000aa11-aa11-aa11-aa11-0138903aaa11</uuid>
Now you need to specify where your image is located. Now this can look a couple of ways, depending on the image you are using. Make sure to use the correct source file as this is a general reference.
## For .img image use:
      <driver name='qemu' type='raw' cache='none' io='native'/>
      <source file='/data/vmdisks/vm-name-folder/vm-name.img'/>
## For qcow2 images:
      <driver name='qemu' type='qcow2'/>
      <source file='/data/vmdisks/vm-name-folder/vm-name.qcow2'/>
Lastly, you need to make a decision on if you are going to use individual vmbrs, or use the “master” vmbr. For individual vmbrs, you pass the vmbr belong to the network you wish to pass, in our example, vmbr60:
 <interface type='bridge'>
<mac address='52:54:fe:73:f2:38'/>
<source bridge='vmbr60'/>
<target dev='vnet0'/>
<model type='virtio'/>
<alias name='net0'/>
<address type='pci' domain='0x0000' bus='0x02' slot='0x01' function='0x0'/>
</interface>
For the master vmbr, you just pass vmbr0:
 <interface type='bridge'>
<mac address='52:54:fe:73:f2:30'/>
<source bridge='vmbr0'/>
<model type='virtio'/>
<address type='pci' domain='0x0000' bus='0x02' slot='0x01' function='0x0'/>
</interface>
Once everything is updated with the correct information, you can define and start your VM:
root@neatrack1 12:05:45
 > /data # virsh define dhcp.xml
Domain dhcp defined from dhcp.xml

root@neatrack 12:05:50
 > /data # virsh start dhcp
Domain dhcp started
In the event that dhcp is already defined due to restarting, use the following command to undefine the host, then proceed to define dhcp.xml again:
> /data # virsh undefine dhcp
Upon trying to define or start the VM, you may receive an error message that looks like this:
error: Failed to start domain dhcp
error: Cannot get interface MTU on 'vmbr60': No such device
This error either means vmbr60 has not been started or the configuration for it in /etc/network/interfaces is incorrect. Before doing anything else, look at /etc/network/interfaces and make sure it looks exactly like the sample. If you check /etc/network/interfaces and find no errors, run this command to try and bring vmbr60 up:
root@neatrack1 12:05:50
 > /data # ifup vmbr60
Any errors given by that command will give extra information about what the error in your configuration file may be. If the problem persists, feel free to use the internet to search for a solution or contact the NEAT Managers/Network Engineer.
Now, enter this command to console into the VM:
root@neatrack 12:07:02
 > /data # virsh console dhcp
Connected to domain dhcp
Escape character is ^]
Press enter to enter the command line for the VM. Log in with the same credentials as you use for the host machine. You should now be logged into the shell of the VM in order to escape back to the host press ctrl + ]
You will notice that the name of the machine is still guest. To change this, use your editor of choice to edit /etc/hosts and /etc/hostname. In those files, replace wherever it says guest with a new name of your choice related to DHCP. After both files are exited and saved, use the following command to restart the machine.
root@guest 12:07:02
 > # reboot
Once the VM boots back up it should now look something like this:
root@dhcp 12:07:02
> #
Set Up DHCP
The purpose of this server is to set up a DHCP machine that gives out IP addresses.
Whenever you plug a machine into your server it gains an IP address. The process that it is gained is called DHCP. When this VM is running, it will give out IP addresses and will not require static IPs to be set. This allows for machines to be connected spontaneously and still get an IP address.
Before we set up the DHCP server, we need to give the VM an IP address by editing the /etc/network/interfaces file to look similar to this:
auto lo
iface lo inet loopback
auto ens2
iface ens2 inet static
address 172.30.60.15/24
gateway 172.30.60.1
If you happed to use the vmbr0 method instead of passing through an individual vmbr, it will look more like this:
auto lo
iface lo inet loopback
auto ens2
iface ens2 inet manual
auto ens2.60
iface ens2.60 inet static
address 172.30.60.15/24
gateway 172.30.60.1
After this is, make sure to “ifdown” and “ifup” your interface to set the changes and run “ship” to make sure that the new IP took.
The gateway address of 172.30.60.1 is the IP address on the router that we will be configuring in the next lab.
The program we use is called isc-dhcp-server. This package is already installed on the guest machine; therefore, it was transferred to this machine when you made the copy.
To set up DHCP, open the /etc/dhcp/dhcpd.conf file with your editor of choice (vim, nano, jed, etc.).
At the top of the file, we define the domain name and dns server for all the dhcp clients.
option domain-name "lab.train.org";
option domain-name-servers 172.30.60.1;
Set the domain name to whatever you please. We are using 172.30.60.1 as the dns server for this example, but you can just as easily use something else like 8.8.8.8. Next, we get to the actual subnet-specific settings:
subnet 172.30.60.0 netmask 255.255.255.0 {
    range 172.30.60.100 172.30.60.200;
    option subnet-mask 255.255.255.0;
    option broadcast-address 172.30.60.255;
    option routers 172.30.60.1;
}
First, we define the network to use as 172.30.106.0/24. Next, we say that ip addresses will be distributed from 172.30.106.100-200. The subnet mask defines the size of the network, and the broadcast tells which hosts to broadcast requests to. Finally, we use the ip of the router as the router option.
Now, we just have to set a few basic rules and we’re done:
default-lease-time 600;
max-lease-time 7200;
authoritative;
The first two lines define how long to keep dhcp leases for. The default is 600 seconds, but if a client requests, it can go up to 7200 seconds. Authoritative says that this is the only dhcp server on the network.
If everything worked correctly, the file should look like this:
default-lease-time 600;
max-lease-time 7200;
authoritative;
option domain-name “lab.train.org”;
option domain-name-servers 172.30.60.1;
subnet 172.30.60.0 netmask 255.255.255.0 {
range 172.30.60.100 172.30.60.200;
option subnet-mask 255.255.255.0;
option broadcast-address 172.30.60.255;
option routers 172.30.60.1;
}
Per usual, make sure you have copied the file EXACTLY correctly. If this file isn’t copied correctly, the dhcp server may not work.
Restart the isc-dhcp-server service, after testing the configuration and you should be all good:
root@dhcp 09:38:44
 > ~ # service isc-dhcp-server restart
If you get errors, run this command to get a more detailed idea of what went wrong:
root@dhcp 09:38:44
 > ~ # dhcpd -t
You now have a running DHCP server! If you create a 2nd vm on the host, you no longer have to define a static ip as it should get its ip address from the DHCP server.
Now that you are done configuring the vm, you can exit the vm by entering the “Ctrl+]” command.
It is important from this point on to always have this machine running when you’re using your server. You can make sure of this by going back into the host machine and using the following command:
root@neatrack1 12:07:02
 > /data # virsh autostart dhcp
Test your new DHCP server with a 2nd VM AND a physical host (like a laptop or Nuk connected to the same VLAN that your DHCP server is running on). You need to be able to get a DHCP lease to validate your DHCP server is healthy. You can make a guest VM to test your connection by configuring it to use vmbr60 and in the guest VM, configuring its IP address to request a DHCP address. If you’re using a physical host, plug it into one of the ports configured to use vlan60 and see if you’re laptop gets a DHCP address.
ip addr show
If the server is working properly, the inet address should be 172.30.60.XX with XX between 100 and 200 changing with each client.
If you don’t see an IP address, it’s possible your machine doesn’t automatically ask for IPs. In this case, we can use the Linux command “dhclient <interface>”
For example, if you are connected via interface eth0, you would run this command:
dhclient eth0