Dynamic Routing Using OSPF Lab
Introduction
At the end of the previous lab, we discussed how static routing works adequately in smaller networks, but it is limited when expanding to larger networks. As you saw in the Static Routing Lab when we added spoke3, larger networks would place quite a burden on the admins, requiring multiple devices to be configured to support the new network. Additionally, static routing just won’t do the job for multi-path networks. In this lab, we are going to replace the static routing we did in the previous lab with dynamic routing to establish an identical network.
We will be utilizing OSPF which stands for “Open Shortest Path First.” OSPF is a dynamic routing protocol that automatically picks the least costly route to send packets of information. This allows networks to have more than one way ‘out’ to the internet or other networks or devices with the best path selected automatically. For example, a company might have two locations with fiber between them and an internet connection on both. If they’re using OSPF, then if one building’s internet goes out the traffic will automatically be routed through the other one.
When configuring OSPF, you simply tell the router what LANs it is directly attached to and what interfaces it should listen on. If there is another OSPF router connected on that interface that is configured properly, the routers will become neighbors and exchange information about what they know about their networks. This allows the network routes that we made in the previous lab to build themselves. This greatly simplifies setting up routes, especially in a larger network.
Overview
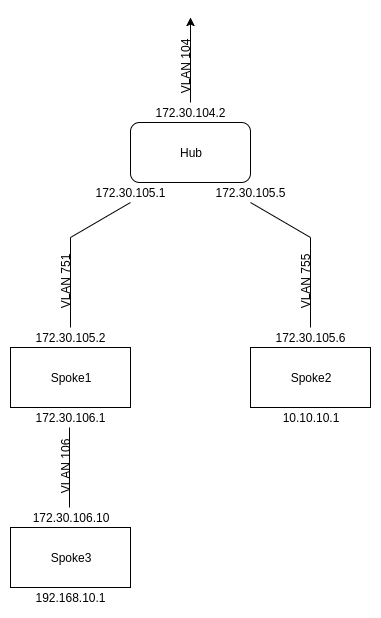
In order to implement OSPF in our network, we really only need to change a few files from the previous lab to make it functionally equivalent. We will need to remove the static routes from our routers, and then configure OSPF on each of them. These configurations differ between Cisco routers and BIRD machines, so we will have to configure each of them separately. As I mentioned in the static routing lab, in our setup, we used a Cisco router as our hub, and then 3 BIRD VMs as each of our spokes, but you could set it up differently.
If you are using Cisco equipment, you may continue to the next section below. If you are using Juniper equipment, please go to the Juniper Routing with OSP section, which is after the Cisco Routing with OSPF section and before the Bird Routing with OSPF section.
Cisco Routing with OSPF
Before we begin setting up OSPF, we need to remove our static routes to prevent any conflicts. To do this, use the command “do show run | inc route” while in normal configuration, which will list all of the static routes you have set on the router. In order to delete them, type in each line with the word “no” before it. For example, to delete “ip route 10.10.10.0 255.255.255.0 172.30.105.6” use this:
trainrtr(config)#no ip route 10.10.10.0 255.255.255.0 172.30.105.6
Make sure to do that for all of the static routes. Afterwards, if you run “do show run | inc route”, it shouldn’t print anything.
Setting up OSPF on Cisco isn’t too difficult, but you do need to configure each of the interfaces that you want to use OSPF on. In our case, we want to do that on each of the sub-interfaces that we have the different VLANs on. Enter the configuration terminal for the sub-interface using the “interface FastEthernet 0/0.x” command as you did in the previous lab. Then enter these commands:
trainrtr(config-subif)#ip ospf cost 100
trainrtr(config-subif)#ip ospf hello-interval 6
Do this for each of your sub-interfaces on the router EXCEPT for the firewall interface. The firewall lab will start with static routes and then will be replaced with OSPF, so leave this interface as it is for now.
The hello interval in this lab is set to 6 seconds, changed from the default 10 seconds. This is because the hello-interval is how often OSPF routers check to see if the other routers are still up. With a shorter interval a router can realize more quickly that a route is down and redirect the traffic. By convention, a router that doesn’t respond to four consecutive ‘hellos’ is considered dead. Why not just make the interval a second or two then? If the router is briefly overloaded or lagging we don’t want the route to go out, so by having a slightly larger value like 6 it’s forgiving while still more responsive – 24 seconds to ‘dead’ instead of the default 40.
In order for a router to participate in OSPF, the router must have a unique id. An id is usually just one of the router’s ip addresses and is used to identify it for its neighbors. If you remember, we actually set a router id when configuring BIRD in the static routing lab, but we need to do that in Cisco now. To do this, we will create a loopback interface.
In the static routing lab, the BIRD routers’ IDs were simply their external IPs. For OSPF we don’t want to do that. A common misconception is that if the interface associated with that address goes down, OSPF would stop working on other interfaces for that router. In reality, this is not true. The Router ID (RID) just needs to be a 32-bit number that is globally unique. For OSPF, the value of a loopback interface for a RID is human-manageability and clean network design. That said, the TCP sessions that Border Gateway Protocol (BGP) runs under will break when the IP address the BGP session is running on is not reachable. To avoid this problem, we create a dummy loopback address on a fake interface within the machine. This interface simply holds an IP address the router can use as its ID, because we know it will never go down. We call this an ‘always-up interface.’ Since most networks will use BGP eventually, getting the OSPF RIDs prepared for this is a good idea anyway.
Creating a loopback interface on a Cisco router is straightforward. First, we create interface Loopback1:
trainrtr(config)#int Loopback1
After that, all we have to do is give it an address, subnet, and a description. We’re using a /32 subnet, meaning it holds just one address, which we’re using as the router’s id.
description ospf loopback
ip address 172.31.0.10 255.255.255.255
Now that all of interfaces are configured, you need to configure the general settings for OSPF. To do this, enter the OSPF configuration terminal by using this command:
trainrtr(config)#router ospf 1
Now we can just use the IP we set for our loopback interface as the router id.
trainrtr(config-router)#router-id 172.31.0.10
Finally, we need to specify which networks the router has as LANs. That way other routers can see what networks the hub can access. The hub should have access to two networks: 172.30.105.0/30 and 172.30.105.4/30. When defining the networks though, instead of using a subnet mask, we use what is called a wildcard mask. It serves a similar purpose and is simply the inverse of a subnet mask. For example, a 255.255.255.0 subnet mask would have a wildcard mask of 0.0.0.255. Use this command to add in the first network.
trainrtr(config-router)#network 172.30.105.0 0.0.0.3 area 0
Area 0 is essentially the backbone set for OSPF and is almost always the area used. While it is possible to use other areas for extremely extensive networks, area 0 is usually the way to go.
Now go ahead and add in the other network to the router.
Most of the time when setting up a router for OSPF, we want one or more of our interfaces to be “passive”, meaning it is an interface where the router connects to its own LAN. It doesn’t need to pair with other routers on this LAN, but still has end devices that will participate in the routing. Because each of the interfaces on our hub has a router connected, we don’t need to configure a passive interface right now, but we will use something similar on the LANs for our spokes which don’t have routers attached. For future reference though, in order to set an interface as passive, just use the “passive-interface <interface>” command while in the OSPF configuration.
That’s it for the OSPF configuration on Cisco. We can’t test the routes just yet because there are no other routers using OSPF on the network, but once we add those in it should be functioning. You can view the OSPF section of the config on Cisco like so:
show run | sec ospf
Juniper Routing with OSPF
Before we begin setting up OSPF, we need to remove our static routes to prevent any conflicts. To do this, view the [edit routing-option] section of the configuration and delete the static routes in that section. Now to configure OSPF in Juniper, it is surprisingly simpler than Cisco. You will first navigate to the [edit protocols ospf] section:
[edit routing-options]
root@s-neatrack# top edit protocols ospf
We want our OSPF to look like the following, making sure that we are adding each irb on the SRX that we want to advertise:
area 0.0.0.0 {
    interface irb.751 {
        metric 100;
    }
}
We also need to set the router ID. The important thing to remember is that technically the router ID can be any IP address as long as each one used in the OSPF network is unique to the device. A duplicate router ID can cause major networking problems. In our case, we will use 172.30.60.1 since it’s an IP that the SRX is using:
[edit protocol ospf]
root@s-neatrack# top edit routing-options

[edit routing-options]
set router-id 172.30.60.1
Commit you changes and make sure there aren’t any errors.
BIRD Routing with OSPF
Now luckily for us, configuring OSPF on BIRD is really quite simple. The only thing we need to change is /etc/bird/bird.conf by removing the static routes and then adding in the ospf configuration. Start out by consoling into spoke1 and using a text editor to go into the bird config file.
As I mentioned during the Cisco and Juniper configuration, in order for OSPF to work, the router must have a router id, but we should have already assigned that during the static routing lab. This should be one of the first few lines in the configuration file. If it is not, add in the line:
router id 172.30.105.2
Now we need to remove the static routes. In order to do this, we can either completely delete the lines within the protocol static statement, or simply comment them out. Commenting is nice because if we ever need to revert back to static routing, we can just uncomment the lines. To comment out a line, just add a “#” at the very beginning of the line you wish to comment out.
To configure OSPF at the end of your BIRD file, add in the following configuration:
protocol ospf {
    import all;
    export none;
    tick 2;
    area 0.0.0.0 {
        interface "ens5" {
            hello 6;
            retransmit 6;
            cost 100;
            transmit delay 5;
            dead 24;
            type broadcast;
        };
        interface "ens2" {
            hello 6;
            retransmit 6;
            cost 100;
            transmit delay 5;
            dead 24;
            type broadcast;
        };
    };
}
As you can see, for BIRD we had to configure a few extra things that we didn’t bother to do in Cisco, but it is all in one quick blurb. A lot of it is quite similar too: We have to configure the interfaces we are using; we tell the router to use area 0, or 0.0.0.0 (BIRD’s equivalent), and we specify the cost of using the connections.
One thing you might notice about BIRD though is that we never have to specify the networks the way we did in Cisco. BIRD actually does this automatically: as soon as you add the interface to area 0.0.0.0, it will automatically find any networks attached. Because of this, there are no specific IPs or subnets in the configuration. This allows us to essentially copy and paste this configuration from router to router, as long as they have different router ids.
protocol ospf: defining what protocol we’re using
import all: OSPF is importing router from the routing table
export none: OSPF is NOT exporting any of its routes out
tick 2: number of seconds until it checks for a state change in neighbors
hello 6: how many seconds it waits until sending another hello message
retransmit 6: how many seconds it waits to resend unacknowledged updates
cost 100: cost of the output for a specific interface
transmit delay 5: estimated delay of link stat updates of the interface
dead 24: how long the interface waits until its neighbor is considered dead
type broadcast: this lets the designated router handle link-state databases
Now we are going to add a loopback interface in spoke 1. Create (or edit if existing) /etc/rc.local and add the following line to the top of the file you created – it tells Linux to execute the file
#!/bin/sh -e
After that, you’re ready to configure your loopback ‘dummy’ interface. Add the following code to the bottom of your rc.local file to create the loopback interface:
/sbin/modprobe dummy
/sbin/ip link set name eth10 dev dummy0
ip address add 172.31.0.11/32 dev eth10
exit 0
/sbin/modprobe dummy: allowing the creation of a dummy interface
/sbin/ip link set name eth10 dev dummy0: setting the dummy interface to be dummy0 on eth10
ip address add 172.31.0.11/32 dev eth10: assigning an IP address to the dummy
exit 0: this is the successful exit of the file
Once you’re done editing rc.local, we need to make it executable. We do this using chmod:
chmod +x /etc/rc.local
Lastly, we need to make the interface we just created a stub network. Fortunately we can do this in just one line by saying “stubnet” followed by the IP address and mask. Within the bird.conf file, add the following line to the end of the area configuration in OSPF protocol config (after the interfaces):
protocol ospf {
    import all;
    export none;
    tick 2;
    area 0.0.0.0 {
        interface "ens5" {
            hello 6;
            retransmit 6;
            cost 100;
            transmit delay 5;
            dead 24;
            type broadcast;
        };
        interface "ens2" {
            hello 6;
            retransmit 6;
            cost 100;
            transmit delay 5;
            dead 24;
            type broadcast;
        };
stubnet 172.31.0.11/32;
};
}
As I said, that is it for configuring BIRD. Exit your editor and restart the bird service to apply your changes.
You only need to do this for spoke 1 for now. We will apply OSPF to spokes 2 and 3 after we make sure the first connection is working.
Testing
In order to test OSPF, you first want to determine if the two routers are now “neighbors”, meaning they see each other and understand their own routes.
To check neighbors in Cisco, use the command “show ip ospf neighbor”. And in Juniper, use the comman “show ospf neighbors”.
In your spoke, you first need to enter the BIRD terminal by typing “birdc” (use Ctrl-C to exit bird terminal). Then use the command “show ospf neighbors” to list all of its neighbors. You can also use “show ospf topology” to show connected networks and the distance to each of them.
Additionally, you can use “show ospf lsadb” to show each connected router, and importantly what LSA (Link-State Advertisement) type the network is. Type 1 (Router LSA) means the router is advertising to one other router. Type 2 (Network LSA) means it is advertising to multiple other routers. Most notably, Type 5 (Autonomous system external LSA) refers to a non-OSPF network that is being redistributed and advertised by an OSPF router. This command along with “show ospf topology” is a great way to check if your network is set up in the way you intended.
If each of the routers has the other router as its neighbor, it means that they have successfully found each other and shared their routes. You should then be able to ping from a device on spoke1’s LAN (such as spoke3 or a laptop) to the hub.
If you are having issues, make sure that you added the proper networks to the hub, otherwise the interface won’t try to look for OSPF on it. You should also make sure that you have properly restarted the bird service on your spoke 1. If it is giving you errors, run the “journalctl -xe” command and see if it mentions a syntax error. Fix the syntax error if there is one, otherwise you can try restarting the VM to kill any old processes.
General OSPF Configuration and Troubleshooting
What did we just make? What does it do? This section will explain at a high level how to set up, view, and troubleshoot OSPF network connections. Because Bird and Cisco ultimately function this same way with different syntax, these concepts apply to both configurations.
Configuration
Each OSPF router should have a unique ID (on a loopback interface)
Each interface should have its own WAN address to advertise/listen on. Make sure all OSPF devices on that network are properly configured, including sharing the same hello interval!
Troubleshooting
When troubleshooting OSPF, the first things to check are the physical interfaces on the devices. For any Cisco devices, first check all interfaces to see if they are configured properly with “show ip interface brief”. The equivalent command for Linux is “ship” or “ip a”. This will confirm that all of your interfaces are up and have the proper IP addresses and subnets. If all of the interfaces are correctly configured, go on to OSPF troubleshooting.
Network problems such as OSPF issues can often by tracked down by going step by step to pinpoint the disconnect. Following these steps can identify where OSPF is failing to connect. Note that BIRD commands are executed inside of the BIRD terminal.
1. Show OSPF on the interfaces
BIRD: “show ospf int”
Cisco: “show ip ospf int”
Juniper: “show ospf interface”
2. Show neighbors/adjacencies
BIRD: “show ospf neighbors”
Cisco: “show ip ospf neighbor”
Juniper: “show ospf neighbor”
3. Show OSPF topology/database
BIRD: “show ospf topology” and “show ospf lsadb”
Cisco: “show ip ospf database”
Juniper: “show ospf database”
4. Look at rib/fib (Routes)
BIRD: “show route”
Cisco: “show ip route”
Juniper: “show route”
If all of these seem to check out (or if none of them seem to be the issue), double check that your router has a unique ID (in BIRD check both /etc/rc.local AND /etc/bird/bird.conf).
Adding Spokes
Now that you have communication between spoke 1 and the hub, let’s add the other two spokes. You can follow the exact same configuration guide as with spoke 1, just make sure they have unique router ids and that you remove their static routes. However, please note the following paragraph.
There is one difference between spoke 1 and the other two: spoke 1 has another router attached to its internal LAN while the other two don’t. We are going to use a similar concept to the passive routers that were mentioned while setting up the hub, only on BIRD they are known as stub networks. They function in very similar ways and are both easy to configure. For BIRD, while you are editing /etc/bird/bird.conf, add in the line “stub yes;” to the internal interface configuration of the spoke. It should look similar to this:
protocol ospf {
    import all;
    export none;
    tick 2;
    area 0.0.0.0 {
        interface "ens5" {
            stub yes;
            hello 6;
            retransmit 6;
            cost 100;
            transmit delay 5;
            dead 24;
            type broadcast;
        };
        interface "ens2" {
            hello 6;
            retransmit 6;
            cost 100;
            transmit delay 5;
            dead 24;
            type broadcast;
        };
    };
}
In this case, we had ens5 as our internal interface, but make sure you alter the correct interface (may be different from the example).
Final Testing
After adding both spokes 2 and 3 to the OSPF network, you should see them as neighbors to any adjacent routers (meaning spoke 3 won’t see spoke 2 and the hub, but will see spoke 1). If this is the case, try pinging across the network and testing the routes. If this is all working you are good to go.
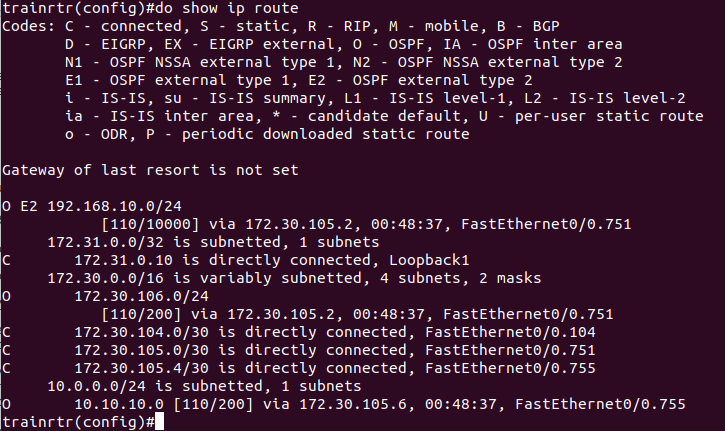
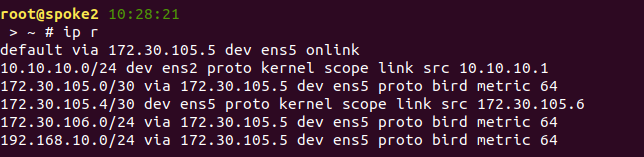
If you are able to ping certain devices and not others, it is a good idea to check the routes on each device. On Cisco, you can see the routes with the command “show ip route” or “show ip route ospf” to show specifically OSPF routes. You can also do this on your spokes using the command “ip r”. Each of these will show the networks that the device knows to route to, so you should be able to see all of the networks on each device. These are examples of what the routes might look like:
On Cisco:
On Juniper:
root@s-neatrack> show route
inet.0: 3 destinations, 3 routes (3 active, 0 holddown, 0 hidden)
Limit/Threshold: 32768/32768 destinations
+ = Active Route, – = Last Active, * = Both
0.0.0.0/0 *[Static/5] 3w6d 03:26:14
> to 192.168.5.1 via irb.5
192.168.5.0/24 *[Direct/0] 3w6d 03:26:14
> via irb.5
192.168.5.12/32 *[Local/0] 3w6d 03:26:14
Local via irb.5
inet6.0: 1 destinations, 1 routes (1 active, 0 holddown, 0 hidden)
Limit/Threshold: 20480/20480 destinations
+ = Active Route, – = Last Active, * = Both
ff02::2/128 *[INET6/0] 3w6d 03:27:02
MultiRecv
On Linux:
If you notice routes are missing, you should be able to tell where problems are occurring in order to narrow down the issues.
Bonus Section: Security
A potential security issue with the network we just set up is that OSPF is being broadcasted on Spoke1’s LAN. This means anyone connected to Spoke1 could mess up routing by advertising OSPF. One way to prevent this is to add authentication so that only devices with the correct password can advertise OSPF to our routers. Doing this is fairly simple, we just add the password and enable cryptographic authentication.
To do this in Cisco, first go into the sub-interface and then run the following command:
ip ospf message-digest-key 1 md5 15learner
Note there is no . in our password (unlike our usual 15.learner). It’s bad practice to use punctuation other than -, _, or maybe @ in keys and pass strings.
Then go into your router OSPF config (“router ospf 1”) and enable authentication with
area 0 authentication message-digest
Doing this in BIRD is just as easy. Simply go into your BIRD config and add both the password and enable authentication under the interfaces that are broadcasting OSPF.
authentication cryptographic;
password "15learner";
Bonus Section: Redistributing Static Through OSPF
It’s possible to connect to OSPF routers with static subnets. This simple modification will change spoke3 to a fully static network while still functioning identically. This is done with just a few changes to BIRD’s configuration.
First, change your spoke3 route back to static – the way it was prior to OSPF.
After that, leave spoke1’s OSPF alone but add a static route in spoke1 from spoke3’s LAN (192.168.10.0/24) to its wan address (172.30.106.10).
Next, in spoke1’s OSPF protocol (but not in an interface) add the following command:
export where source=RTS_STATIC;
Now that spoke1 will no longer have any OSPF networks connected through it, we can disable OSPF advertising on its LAN altogether. A password is secure but denying the possibility of cracking it is even better. Simply add the following command to Spoke1’s LAN interface:
stub yes;