Student Setup (Juniper/Cisco and KVM)
Introduction
The goal of this exercise is to set up the KVM host and Cisco switch so that they can talk to each other. In later labs, the switch will be used to isolate traffic between virtual machines on the KVM host using VLANs.
What are VLANs?
A VLAN is a Virtual Local Area Network where multiple devices can be grouped together to create a single logical unit. You can set multiple groupings so that you won’t need a separate device for each local area network or LAN.
Prerequisites
This lab requires no prior experience or knowledge. However, there will be links to skills that will be required for this lab. When you finish this lab, you should be able to:
Set up basic configuration for a switch
Configure switch interfaces
Configure interfaces on a KVM host
Configuring the Switch
In this lab you will be configuring a Juniper switch. This will be done via console, once we have the switch configured and have done Juniper Lab we can being setting up the NeatRack Lab to eventually have SSH access to everything. There are two ways to get console into the switch.
Once you are consoled into the switch, you may have to press ENTER to receive output. Since we are using a default configuration, you’ll be able to login with the root username with NO password. If you are prompted for a password, please notify the NeatRack trainer.
Depending on the equipment on hand, there are two guides to follow, one for Juniper and the other for Cisco:
Before Configuring the KVM Host
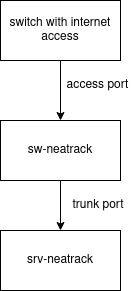
When we first got the KVM host set up, we had plugged the host directly into a switch to allow the KVM host to obtain a DHCP address in order to finish setting it up. Now we need to adjust the connections for this and future labs to work correctly. We are going to move the Ethernet cable that connects the host to the switch we used to obtain a DHCP address and move it to one of the trunk ports on our switch that we just configured. Then, we will connect our switch via one of the access ports we’ve configured to the switch that gave our host the DHCP address. Our physical set up should now look something like the following.

Configuring the KVM Host
Log into the KVM host with the username and password you put on the KVM host when you set it up in the Setting Up the KVM Host lab.
Now, we’re going to edit the interfaces file using nano:
test@test:~$ nano /etc/network/interfaces
Remove everything below the loopback line and replace it with this:
Note: Depending on the hardware your server is using, the primary physical interface might be called something different from eth0. Use the command “ip a” to list your interfaces. It probably looks like “enp2s0”, “eno1” or “ens2”. If that is the case, everywhere that “eth0” is used in the configuration below, replace it with whatever your interface is. Also, you need to make sure you’re using the correct vlan and vmbr for your Internet connection. You may have to ask a network engineer which vlan and vmbr you’ll need to use.
auto eth0
iface eth0 inet manual
up /sbin/ifconfig $IFACE up
## Server LAN
auto vlan60
iface vlan60 inet manual
vlan-raw-device eth0
auto vmbr60
iface vmbr60 inet static
    address 172.30.60.10/24
bridge_ports vlan60
bridge_hello 2bridge_maxage 12
bridge_stp off
bridge_fd 9
up /sbin/ifconfig $IFACE up || /bin/true
## Internet Connection
auto vlan14
iface vlan14 inet manual
vlan-raw-device eth0
auto vmbr14
iface vmbr14 inet dhcp
bridge_ports vlan14
bridge_hello 2
bridge_maxage 12
    bridge_stp off

    bridge_fd 9
up /sbin/ifconfig $IFACE up || /bin/true
We put dhcp on the vmbr interface instead of the physical interface because if we need to use the same vmbr for a VM, we’ll be able to easily get a DHCP address. When you put an IP address attained from DHCP on a physical interface and then try to use DHCP on a vmbr or vlan interface, you will not get a DHCP address, because the physical interface will be preferred over the vmbr/vlan interface.
Now, type this to restart networking so that vmbr60 and vmbr10 can be used:
service networking restart
This command is alright to use since we don’t have any VMs running, however, when we begin to add more, you will not want to the use this command. This will take down all of the interfaces, which could bring down other VMs. Instead, we use:
ifup vlan14 && ifup vmbr14
ifup vlan60 && ifup vmbr60
We do this so that we only have to bring up an individual interface instead of restarting the whole network. Take note that you should bring up the vlans before the vmbrs because the vlans are what the vmbrs are tethered to. Also, we can bring up both the vlan and the vmbr without having to type in each command individually with the use of &&. This makes it to where we can run two commands on the same line, assuming that the first command is completed successfully. This saves time and typing when you bring up vlans and vmbrs in this way.
